Thursday, December 30, 2010
New French Curves
I've had this ruler for years. It has cracks here and there, a melted section from my iron, but I love it; mainly, because I've had it forever, and I can see through it. I can't trace patterns without it. Sadly, I accidently dropped it a month ago, and the top broke clean in half. I've look around at the local sewing stores and was surprised to find that it is not carried. Shows how times have changed. I placed clear tape on both side of the cracks and it works just fine.
I received these two lovely rulers for Christmas, so I promptly placed the old one in the trash. As I passed my sewing studio, I saw it sticking out of the basket. I felt really sad that I discarded this faithful tool so casually. I just had to pull it back out. I am fortunate enough to own three french curves.
Sunday, December 26, 2010
Official Start of SWAP
Today is the first official day of SWAP 2011. It takes great dedication to complete this contest. I had great hopes of having almost two dresses completed by the end of the year, but life and the holidays got in the way along with a cold, so that goal is not likely to happen.
Today, I am working on tracing Vogue 7609 and placed a fabric order with Vogue Fabrics. I am taking one day at a time, and hope to post my progress weekly.
My first step with Vogue 7609 is to make the pattern larger. I first trace the original pattern pieces to preserve the pattern. These vintage patterns look different.
There is no writing on the pattern pieces. Seam allowances are included, but you have to match the geometric symbols. You also have to reference other sewing sources. This pattern mentions a "gusset", but is not specific. Luckily, I own a couple of vintage sewing books.
I began the enlargement process vertically on the top by taking a measurement from one bust point to another and adjusting the pattern accordingly by placing the pattern straight on grain and cutting from top to bottom. Whatever is added to the front, I duplicate in the back. Next measurement is bust circumfrence, adding two inches for ease, adjusting equally front and back. I try to work around dart positions. Next measurement is waist. These vintage patterns have pretty tight waist lines. I took out the side curves. Final check is sleeve circumference.
Friday, December 24, 2010
Grandson's Hat & Socks
I finished these two Christmas gifts in the nick of time to be wrapped for Christmas. The baby socks were really easy and making them helped me understand what I need to do to finish the gingerbread socks. The hat is super soft and is a practice item for a spring Aran knit sweater I want to make for my grandson.
Wednesday, December 15, 2010
A Photo of The Blue Striped Shirt
I joined my DH on a business trip to LA. As Christmas presents to two DSs and one lovely Daughter-in-Law in other states, we had them join us. What an amazing time we all had. I brought the blue striped shirt with me, and a measuring tape for an arm length (35 inches) for a long sleeved shirt in the future. The shirt is loved and appreciated and appears to be an all around good fit. Here the unsuspecting model is in our hotel and on the Queen Mary.
On one of our tours around the city, I saw Mood Fabrics, but stayed away. I am trying hard to stay dedicated to not buying more fabric until I use up a substantial amount of what I already have. On a prior trip, I managed a visit to the Garment District. What an experience.
Wednesday, December 01, 2010
SWAP 2011 - Knit Top
I rarely sew with knits, and I have no good reason for explaining that. I even have a serger. I usually use my serger to finish off woven seams. I can't recall ever making anything from lace. This SWAP piece will use both techniques ~ knit and lace.
Pattern: Simplicity 6703 View1.
Description: Top stitched top has scoop neckline, lace inset
at yoke, and extended shoulders forming cap
sleeve.
Fabric: Outter top: black stretch lace purchased from
Denver Fabrics, Denver, CO.
Top Lining: nude strech fabric purchased
on-line from Emma One Sock.
New Techniques: Sewing with knits.
Sewing with lace.
Tuesday, November 30, 2010
SWAP 2011 - Two Simple Blouses
I'm making two useful silk blouses from this pattern.
Pattern: McCall's 7883 from 1982.
Description: Pullover blouse with round or V-neckline has
buttoned left shoulder opening. Top-stitch
trim for all views.
Fabric: Black silk charmeuse purchased in LA Garment
District
Gold silk charmeuse purchased in LA Garment
District
New Techniques: French seams, covered buttons, hand picked
top stitching.
Sunday, November 28, 2010
SWAP 2011 - Skirt and Blouse
I already showed this pattern, but I didn't state what I was going to do with it.
Pattern: KWIK-SEW 3494 in 2007
Description: Fitted skirt has waistbank, zipper at center back,
straight cut front, and extreme flare at lower edge
of back panels. Fitted sleeveless top has lined
bodice, boat neckline with cowl collar empire
waist with darts, panel seams on lowerr top, and
side seam zipper closure.
Fabric: Skirt: Black/tan tencel purchased at Denver
Fabrics.
Blouse: Red silk charmeuse jarguard, purchased
in Denver.
New Techniques: Skirt: Hong kong finished seams, invisible
zipper, faced waistband.
Blouse: French seams, invisible zipper.
Saturday, November 27, 2010
SWAP 2011 - Trousers
I'm making one pair of pants for SWAP. I've loved this trouser pattern since I received my Burda World of Fashion Magazine in 2008. I just hope its a good fit. If not, I'm going to be very disappointed as I have another piece of fabric I want to use this on at a later date. My plan is to ajust the back seam like a man's trouser. I don't usually like garments with side pockets, but I am going to follow the instructions on these.
Pattern: Burda World of Fashion Magazine, 11/2008, 105B
Description: Bias-cut strips (galoons) nicely soften classic
trousers/pants. Unlined trouser, faced waistband
front zipper, inseam pockets.
Fabric: Gray with tan strip, unknown fibers.
New Techniques: Hong Kong finished seams, allowance for center
back seam adjustment, side pockets.
Friday, November 26, 2010
SWAP 2011 - Option #2
Option #2 of the SWAP contest allows for two dresses. I have chosen these:
Pattern: Vogue 7993 from 1953
Description: Flared shirt with shaped centre-front
section, joins the bodice at waistline.
Gathers above a shaped med-section, cut
in one with neck-band. Low V-neck-line,
higher in back. Short sleeves or 3/4 length
push up sleeves.
Fabric: Black and red irredescent from Fabric
Fix, Manchester, NH.
New Techniques: Invisible zipper, covered buttons, hand
made belt, hong kong finished seams,
waist stay.
Pattern: Vogue 7609 from 1952
Description: Four piece skirt with inverted pleat at sides
and at centre-back; released from waist-line.
Pocket from side seams. Skirt joins bodice
at waist-line. Bodice buttons below a narrow
shaped band, cut in one with front of gathered
kimono sleeves. Low oval neck-line.
Fabric: Black silk charmeuse purchased from LA
Garment District.
Black/off white polka dot silk chiffon purchased
from LA Garment District.
New Techniques: Bound button holes, french seams, invisible
zipper, covered buttons, hand made belt,
waist stay.
Wednesday, November 24, 2010
SWAP 2011 - Storyboard
I spent some time gathering all my patterns and fabric swatches to display my storyboard. I decided on option #2 which allows for two dresses. The colors are black, gray, red, tan, gold. I own two pairs of dancing shoes. One is black, the other tan. I haven't yet decided on the option piece. I may just purchase a shawl.
Tuesday, November 16, 2010
Waistbands For The Toddler Grandson
Instead of using one row of one inch elastic for these corduroy pants, I made two channels for two rows of one half inch elastic. I personally find it much more comfortable.
Monday, November 15, 2010
A Night of Buttonholes
Some people sew one garment at a time, but I like to have a couple in various stages of production. Some I am problem solving, others allow me to work on whatever part I feel like working on at a given time. Tonight I worked on bottonholes. The ones on my DS's shirt and my DGS's jacket. I only had time to sew on the buttons for the jacket. Those black buttons upped the cost of the outfit another $10.00.
Monday, November 01, 2010
SWAP 2011 - The Beginning of a Storyboard
In 2003 I moved back to my home state of NH after living for 26 years in CO. I went through a really tough three year period and actully stopped sewing. Something I've done and enjoyed since 5th grade. After living here for a few years, I searched the web for some sewing connections. I discovered the SWAP contest, and it brought back the love with a vengence.
My first contest was business attire, my second a southwestern theme. I met my DH ballroom dancing, so this year I plan on making clothes to go dancing in. Not competition clothes, but clothes I can were to other places also. Below is an example of exactly what I am talking about.
The back of the shorter skirt allows for movement in dancing, but it appears more of a normal straight skirt to wear for an evening out. The top is a perfect garment to wear with a skirt or slacks.
Saturday, October 30, 2010
Pants and Coat For The Toddler Grandson
I hemmed in no time at all the two pairs of pants for my grandson. They were both done my machine. All that's left with the pants is the elastic waistband. I don't usually use one piece of elastic, but multiple, small rows. I have yet to purchase the elastic.
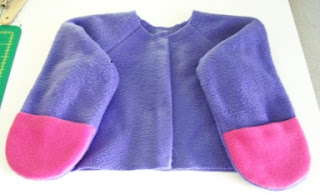
The coat assembly took a little longer. I first stay stitched around the curves of the jacket and the lining to keep the jacket from stretching in those areas. I added a white muslin interfacing on the fleece at the same time I stay stitched the jacket. I hand stitched the interfacing at the shoulder.
What took the most time was the blanket stitch around the edge of the jacket and sleeves. I used a top stitching black thread. To keep the edge as even as possible, I basted around the whole jacket 1/2 inch away in white thread. I inserted the needle and black thread in every other stitch. Here's the jacket with the basting removed. All that's left are the buttons and button holes.
2011 SWAP Contest
The 2011 SWAP contest rules were posted today. SWAP mean Sewing With a Plan. This will be the third year I've participated. This is the 8th annual contest. It started with the challenge of sewing 11 garments ~ six tops, four bottoms, one jacket with every top mathcing every bottom and the jacket pulling each outfit together. You ended with a possible combination of 45 outfits. It has changed a bit over the years. We are to pick one of these challenges.
Option #1:
6 tops - t-shirts, shirts, blouses, or camisoles
4 bottoms - jeans, pants, shorts, skirts or kilts.
1 your choice (not an accesory)
Option #2:
2 dresses - single pieces consisting of top and bottom that can be worn alone.
6 tops - t-shirts, shirts, blouses, or camisoles
2 bottoms - jeans, pants, shorts, skirts or kilts.
1 your choice (not an accesory)
Option #3:
5 dresses - single pieces consisting of top and bottom that can be worn alone.
4 tops - t-shirts, shirts, blouses, or camisoles
1 bottom - jeans, pants, shorts, skirt or kilt.
1 your choice (not an accesory)
3 garments may be purchased or previously sewn.
1 may be knitted or crocheted.
An added twist is that every garment should be made with a technique or feature that the sewist hasn't tried, or hasn't mastered. Sewing begins December 26, 2010 and ends April 30, 2011.
To follow along, please join me and others at Sewing Discussion at Stitcher's Guild Sewing Forum.
Tuesday, October 26, 2010
Pants and Coat For The Toddler Grandson - a night of serging
I spent the evening serging all the possible seams on my DGS's Christmas gift. It only took me 1 1/2 hours. However I spent a previous 45 minutes trying to get my serger threaded correctly. I just had a looper replaced, and the repair person kindly left their thread in place. I knotted the new thread to their thread, but it just wouldn't work right. I couldn't see where my problem was. Finally, I saw the problem, and the rest of the evening sent smoothly.
Monday, October 25, 2010
Greatful Dead Halloween Costume - Finale
Yesterday was the Halloween parade in sweet Miss Harper's hometown. She is looking just beautiful in her costume. I can now see why Moe is such a self-confident dog! I don't think anyone would dare make a remark about his costume. Thank you to Harper's parents for sharing this photograph with us. It looks like a perfect day for a parade, and a perfect day for a picuture. Happy Halloween!
Tuesday, October 19, 2010
Pants And Coat For The Toddler Grandson - The Vision
After digging through my children's patterns while making Miss Harper's Halloween costume, I decided to make my one and only grandson some clothes for Christmas. After all, Christmas is only 61 days away. Yikes! Joann's was having a midnight madness sale, so I picked up these fabrics for $13.06
for this pattern.
The red fabric is fleece, the blue and black fabrics are corduroy, and the train engine fabric is flannel. The flannel will be the lining for the fleece. I will be using a top stitch weight thread for a black blanket stitch around the jacket edge along with black buttons. The buttons haven't been purchased yet. I plan to purchase a couple of white turtlenecks to finish off this gift.
Sunday, October 17, 2010
Greatful Dead Bear Halloween Costume - jester collar
Thursday, October 14, 2010
Greatful Dead Bear Halloween Costume - feet
I traced the three pattern pieces for these slip on booties, so I could preserve the pattern. Seam allowances were 1/4 inches. No trimming needed.
These bear feet were pretty easy to assemble and fun to make. I really didn't know what length to cut the elastic. I measured the width of the bootie and cut the elastic less 1/4 of that width. I'd rather have them too loose than too tight. I stretched the elastic across the fabric and applied it with a narrow zig zag stitch. They appear just right.
Miss Harper could use these booties through part of the winter to keep her toesies warm, since she won't be walking for a number of months. It would be nice to use some of the components of this costume once Halloween is over.
Monday, October 11, 2010
Greatful Dead Bear Halloween Costume - hood and pants
Except for the closures, I've fininshed the top half of the Greatful Dead Bear Halloween costume. I looked through my children patterns to locate some type of pants pattern for the bottom of the costume.
This is exactly what I had in mind. The pajama bottoms consists of one pattern piece and went together quickly. The great part is that Miss Harper can wear them for warmth once Halloween is over. I found that using multiple rows of elastic results in a more comfortable fit around the waist.
I purchased this bootie pattern for the bear feet, but they will have to wait for another day. I may go into a bootie rampage later and donate them to charity. For now, this appears to be a perfect solution for the bear feet. The bottoms will be pink and the rest purple.
The final piece of the costume is the multiple point collar. One for Harper and one for her dog.
Thursday, October 07, 2010
Greatful Dead Bear Halloween Costume - coat
Fabric should also be steamed and not pressed, which, admittedly, I failed to do.
Wednesday, October 06, 2010
Gingerbread Socks - heel
Our knitting group finally was able to meet again. First thing that was noticed was the fact that I have been knitting my socks inside out, and I shouldn't be. I don't know how this came about, but it was an easy correction. On my next pair, and there will be a next pair, I will avoid this mistake. I finished the heels after having to take out a few rows early on. They were an easy task.
Monday, October 04, 2010
Blue Striped Man's Shirt - collar and collar stand
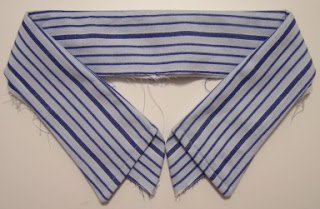
For the interfacing, I used white woven muslin. Interesting that the shirt collars I have taken apart for research purposes show they used two pieces of fusible interfacing. One was the exact size of the collar. The other one was fused to the first but trimmed to stay out of the seam allowances but caught in the top stitching. I am not a fan of fusibles, but my DH seems to like it on his purchased shirts, so next time, I am going to give it a try.
Here's the collar and collar stand attached to the shirt.
All that's left is the button holes and buttons.
Friday, October 01, 2010
Greatful Dead Bear Costume - The Vision
It has been requested that I make a
Halloween costume for my friend's granddaughter, Miss Harper. She's a little over six months old. The community she lives in participates in a family Halloween parade, so she needs to look her best.
This is the pattern, but changes will be made; and the fleece chosen for the project.
This pattern does not provide for the boots.
This is the pattern, but changes will be made; and the fleece chosen for the project.
The back couldn't look more uncomfortable. What child could put up with an elastic across the back of their knee? How cold would her back legs be? This is also one piece ~ hood, coat, pants. I am going to make full pants, for warmth, separate from the coat and hood.
This pattern does not provide for the boots.
Saturday, September 25, 2010
My One and Only
grandson turned one today. This is an amazing picture of him waving to us before he was even born.
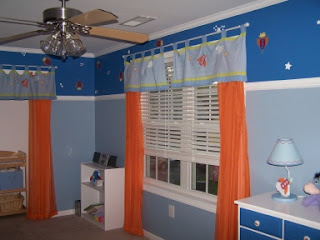
His rocketship room was a group effort to pull together. We think with great success.
One year ago he was such a delicate, beautiful person with so many people happy to see him arrive safe and sound.
What a lot of changes since last year. Happy Birthday to you!
His rocketship room was a group effort to pull together. We think with great success.
One year ago he was such a delicate, beautiful person with so many people happy to see him arrive safe and sound.
What a lot of changes since last year. Happy Birthday to you!
Friday, September 24, 2010
Sewing Room Art
I have three favorite pieces of sewing related artwork on the walls of my sewing studio.
This one is an antique print purchased in 2003 in Breckenridge, Colorado entitled The Butterfly and The Bee.
"The Butterfly and the Bee", by William Lisle Bowles (1762-1850)
Methought I heard a butterfly
Say to a laboring bee:
"Thou hast no colours of the sky
On painted wings like me."
"Poor child of vanity! those dyes,
And colours bright are rare,"
With mild reproof, the bee replies,
"Are all beneath my care.
Content I toil from morn to eve,
And scorning idleness,
To tribes of gaudy sloth I leave
The vanity of dress."
This one was purchased in 2000 at the Booth Mill, in Lowell, Massachusetts. If you peek in the windows of each floor, you will be able to see the carding, spinning, and weaving processes. Fabric made here was shipped all over the world. You learn about these mills in the fourth grade. Visiting one leaves a lasting impression. The mills played a serious roll during the industrial revolution, and women entered the work force.
This final one, crewel embroidery, was handmade by me about 25 years ago. I enjoyed making it, but never made another picture.
Sunday, September 12, 2010
Blue Striped Man's Shirt ~ sleeve insertion; side seams; hem.
I finally had a stretch of time to sew today. My challenge was inserting a man's shirt sleeve into the actual shirt using a flat-felled seam. I decided not to use my new flat-felled foot. I reseached this process, and sometimes people adjust seam allowances. I cut out this shirt before the research. Therefore, I wasn't able to make any seam adjustments, so I just used the usual 5/8" seam allowance.
I proceeded by inserting the sleeves in the usual way. That is, right sides together shirring the sleeve and easing the cap into the sleeve, pucker-free, before sewing the side seams of the shirt or the sleeve. This was easy, since there really wasn't much ease to deal with.
The flat-felled process is:
~ pressing the seam towards the sleeve
~ trimmed the bottom seam allowance in half
~ folding the top seam allowance in half
~ enclosing the half seam into the whole seam allowance
~ top stitching on the right side.
The real look of the flat-felled seam is on the inside.
Next I worked the side seams. It's the same process as above except I sewed the side seams wrong sides together. The flat-felled seam is right side out.
This is how it usually looks.
Before stopping for the day, I wanted to hem the shirt. When making a narrow hem, I sew two rows of basting stitches 1/4 inch apart. I press the fabric on the first basting line, then I press again on the second basting line, then pin. Using my edging foot, I sewed the hem.
A decorative touch is adding my DS's name on the bottom of the front band.
Subscribe to:
Posts (Atom)