Tuesday, July 12, 2011

No Muslin This Time Around

I feel I do pretty well in the sewing arena, but I struggle in the fitting department.  It takes me awhile to figure it out.  Therefore, I usually prepare a muslin of an item I am planning on sewing.  Because I like to think I am getting better at fitting, I decided to make the top, version C of Simplicity 2917 before I start the actual dress.  I found this lovely batik rayon in my stash. 
The colors are coral red, peach, yellow, lilac, and gradations of such.

My main adjustment is for sloping shoulders.  I took two inches out across the back at the arm opening.  A second adjustment was a smig out of the waist curve for sad middle-aged issues.  My final adjustment is raising the waist, because I am short waisted.  I got the side and front pieces all cut and basted together; tried it on, but found it too big in the circumfrence (a good thing) and too high at the bust (a bad thing).  Hence my comment about struggling with fit.  Guess I haven't really made any progress. 

Rarely, do I send things to the trash.  I was tempted.  Instead I recut the waist curves a bit smaller.  In re-evaluating the sloping shoulder issue, I thumped myself on the head.  When making adjustments, if you take away somewhere, you have to put back somewhere else.  I realized that I didn't add the two inches across the arm in the front that I took out of the back.  That's why the bust was too high.  I asked myself why did I do two inches when in a previous garment I did one inch?  I have no answer, but I am going back to one.  Since I can't recut to make the pieces longer, I had to add one inch of fabric at both shoulders and basted it back up.  I don't think it looks too bad thanks to the batik.


The top and dress are designed with princess seams.  A princess seam is used instead of darts.  The challenge is sewing the curves with no puckers.  I matched and pinned up the notches.  Is it possible to fit these pieces together?


You bet with pins and clipping, and it is not difficult to do.  Falls into place quite nicely.


Once I was happy with the fit, I serged all the seams.  In reality I sewed all the vertical seams three darn times.  At least I am getting a summer blouse out of the process instead of a muslin that I would never wear; and hopefully, a perfect fitting dress. 

Saturday, July 02, 2011

Gray & White Striped Dress


For the past couple of issues, Talbots has been showing this summer dress in their catalog, and it keeps catching my eye.  Their dress is navy blue and white with seam pockets and a back zipper.  I like the chevron play of the fabric and the navy contrast at the top and the arm.  Closer inspection reveals top stitching and at least a three inch top-stitched hem. 


I remembered I have lots of this gray and white fabric in my stash, so I am inspired.


I looked through my patterns, but couldn't find one that had a four panel front and back.  Lots of three panels though.  I searched pattern books and found this Simplicity pattern.  Version C appears to be a close match.  It doesn't have side pockets.  I could easily add them, but I'm not going to.  I don't like carrying "stuff" in my pockets.

Saturday, June 25, 2011

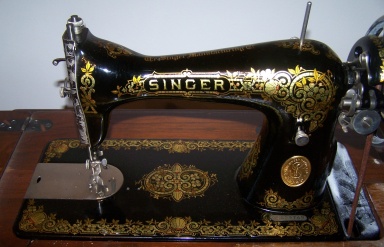
Treadle Sewing Machine

What drew me to the estate sale I went to today was a treadle sewing machine listed on the items available for sale.  I went with the attitude that the cabinet and the machine were probably not in good shape, the chances of me getting it would be slim, and I didn't really need another sewing machine.  I told myself these things to save myself from disappointment.

There were over a dozen people ahead of us waiting in line for the sale to begin.  I kept repeating the above.  Once inside I simply asked where the treadle machine was instead of wasting time looking for it.  I was told, "In the basement in the back corner".  I searched for the basement door.  There were already a few people down there.  I kept thinking I would be too late, but there it was sitting in the middle of one the rooms with the $75.00 tag still on it.  I immediately pulled the tag off before someone else did.  I was so impressed with the condition of the machine that I quickly put a sold sign on it.


The cabinet is damaged, but not like other cabinets I've seen where the veneer is spliting or missing. It is workable; however, I didn't pay a whole lot of attention to its style.  My husband arranged for it to be placed in our vehicle.  When we finally left the sale with a whole lot of other stuff, I noticed how compact the cabinet was.  I've never seen one like this before. 


After some research, I discovered this is a "parlor cabinet".  It's meant to look like a piece of furniture and not a sewing machine.  Nice job!

Here it is opened up, bought as is, with no cleaning.  As you can see, the cabinet has been disrespected.


I was delighted over a few discoveries.  There was the original manual in great shape.  Acesssories were there and the bobbins are round.  It has the cutest oil can.  There is a box of accessories that I'm not sure is original to this machine.  The basis for this is the fact that this machine doesn't use elongated bobbins.  You can see the elongated onces in the case.  These bobbins won't work, but the accessories will.


Further research via the serial number reveals this machine was manufactured in 1922.  What a treasure!

Thursday, May 19, 2011

SWAP Is Wrapping Up

I stopped posting about my SWAP in March to spend all my free time sewing with hopes of finishing.  At one point the light at the end of the tunnel was visible by first changing option 2 (two dresses) for option 1 (tops and bottoms) and being allowed to use 3 pre-sewn or purchased items. 

I've had these two skirts hanging in my closet for too many years. They're are both made from a soft double knit fabric.


The problem with them was that they were too long (at my ankle) and too tight in the waist.  If I altered them at the waist instead of the hem, I could make them wearable.  I started the alteration of the black skirt by marking 10 inches from the top and cutting the fabric away.


As a result, the waist became too large, so I tapered the side seams from the hem to the waist using my serger.  The original waistband was treated in an interesting way. 


I was excited about reproducing it, but realized that if I ever wanted to take the waist in or out, it would become quite a process, so I went with serging the raw edge and encasing the 1 inch elastic.  Here's a before and after photo.


I repeated the same process for the red skirt, except I made the length a bit longer.


At this point I had three completed skirts, two knit sleeveless tops, and one pair of slacks partially completed.

My next project was the KWIK SEW 3494 blouse made of silk.  I avoid knots on silk as much as possible.  A knot wears away at the fabric.  This is how I work my darts. 


My secret for working with silk is to use lots of pins.  I enclosed some of the seams with french seams.


Truthfully, this is my favorite piece.  It's soft and comfortable.  The hem looks crooked, but it is just the way it hangs on the hanger.


At this point I picked up my McCall's 7883 gold charmeuse blouse to finish it up and also cut out a black charmeuse blouse using the same pattern but with a different neckline.  The black blouse went together quickly, because I had already dealt with the fitting issues.  I had enough gold fabric to cut out a silk camisole to wear under my knit tops.  I purchased a black camisole for my final piece.  Now, I had exactly one week before the end of April.  I convinced myself that I could make the deadline.  This was when the light began to fade.

For some crazy reason, the sleeves of the two blouses were shorter at the bottom front edge than at the bottom inside edge.   I had enough fabric to recut the sleeves, but I needed to think about the problem in order to solve it.


I also had to redo the neck top stitching, because they were puckering.  They also needed button and buttonholes. 

I only had the straps of the cami to turn right side out and attach.


The bottom line is that I didn't make the deadline.  Two people did, and congratulations to them.  You have to be dedicated and commited to finish, and they were.  Be proud!

Sunday, March 20, 2011

SWAP 2011 - Week 12 of 17

You've probably thought by now I've given up on the SWAP contest, but I haven't.  I've gotten a bit distracted but also have been working on enlarging McCall's 7883.  It's five easy pieces. 

People sew for a number of different reasons.  One of my many reasons is fit.  My shoulders and collars of my tops, dresses, and jackets pull toward my back.  The round neckline of this pattern pushes on my throat giving me a chocking sensation.  This unbalanced problem causes the blouse to look a bit maternity.  The front hem ends up being shorter than the back and poofs out.  I've seen this look on men also.  I found the solution for this in this alterations book from 1976. 


The author, Kerstin Martensson, made the first pattern produced by KWIK-SEW.  The illustrations are fantastic. 


I sliced both the front and back pattern pieces from a point halfway between the shoulder and the bottom of the arm opening all the way across each piece.  I overlapped the back decreasing the pattern by one inch and separated the front pattern by increasing it by one inch. 

I haven't cut the sleeves yet, but I will need to change the shoulder mark.


This blouse is cut from gold silk charmeuse.   I'm using french enclosed seams; a technique I don't use often.   The smaller the seams, the stiffer the seams are.  To keep the drape soft, I started the first seam by placing wrong sides together and stitching 1/8 inch away from the edge. 


I sewed a second seam with the right sides together stitching 1/2 inch away from the previous pressed edge.